
Training tips
The most important training principles
There are several paths that lead to the goal. Nevertheless, there are some principles that you should definitely follow if you want to be successful in the long term.

Too much time sitting down and incorrect loading can often cause pain and tension in the muscles around the hip joint. Three exercises for improving hip stability and mobility.
Our hip joints are the connection point between the pelvis and legs. Their ball-and-socket shape is designed to facilitate movement. At the same time, this movement also requires stability in order to avoid overloading the hip region.
The hip joint is primarily stabilised by the deep, lateral gluteal muscles and abductors. The gluteal muscles are fan-shaped both deeper down and closer to the surface. This enables us to achieve optimum stability regardless of leg position.
The large gluteal muscle primarily aids in locomotion. If we spend too much time sitting down, the hip flexors automatically start to shorten. When a muscle becomes shorter, its counterpart is forced to elongate. This then affects the gluteal muscles, which can no longer reach their full potential when elongated. This in turn decreases the stability of the hip joint and also diminishes the performance of the gluteal muscles. The shortened hip flexors force the pelvis to tilt forwards when standing, creating a hollow back.
Simply sitting less is usually not enough to resolve this situation; it also requires corrective exercises. If the pelvis is stable, the hip joints can usually regain their mobility. Normally, two training sessions per week are sufficient for stable, flexible hips. However, depending on the extent of the shortening, the exercises may be performed on a daily basis in the beginning to relieve pain.
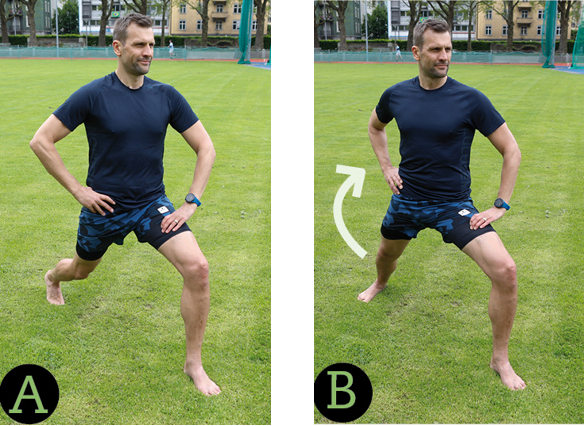
The Warrior pose (image A) is ideal for straightening the pelvis and mobilising the hip joint. This exercise also hones your balancing skills and stabilises the leg axes. The change of pose (image B) allows the hip joints to rotate while demanding stability. This mobilises the interior and exterior rotation of the hip joint.
Here’s how:
Next, move to the second position:
Tip: Place your hands on your pelvis to feel how it moves.
Take note: The front knee should always remain directly over the foot. Always keep your pelvis upright. Do not bend your upper body forwards.
Variation: Place a soft support under the front foot to work on your balancing skills at the same time.
Dosage: 2 sets of 10 repetitions.
Hip and pelvis movement is largely connected to the flexibility and stability of the torso. The more the legs, pelvis and torso work in harmony together, the more stable and targeted the movements. Kneeling on all fours places less weight on the hip joints, allowing better control over the movements. This exercise is challenging for both the supporting leg and the free leg.
Here’s how:
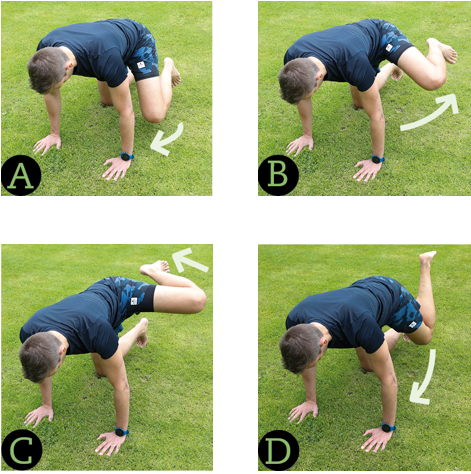
Take note: Distribute your weight evenly over your hands and knee on the ground. The upper body and head should remain still. The movement comes from the hips, pelvis and torso.
Variation: Keep torso and pelvis still so that the movement is controlled solely by the hip joint. The range of movement will be smaller but more challenging.
Dosage: 2 sets of 10 repetitions per side.
Our pelvis and hip joints are perfectly designed to provide stability in any position. However, the muscles need to be prepared for this. Oftentimes, the hip flexors are too short and the gluteal muscles too weak. By practicing standing on one leg, this supports a healthy hip joint. The upper body, free leg and pelvis are reliant on the supporting leg, which needs to be well orchestrated by the entire hip muscles.
Here’s how:
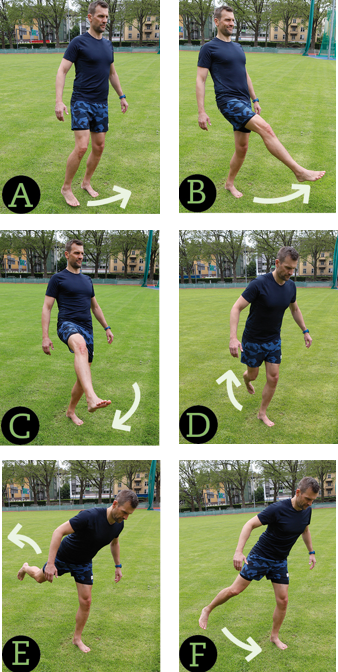
Take note: The axis of the supporting leg should remain intact (knee directly over foot). The free leg should slowly guide the movement in a coordinated fashion.
Variation: Make the movement of the free leg large enough so that the upper body has to move forwards and backwards with it. As the free leg moves forwards, the upper body will move backwards. When the free leg draws the circle at the back, the upper body will lean forwards. The larger the circles, the more challenging this is for the hip muscles.
Dosage: 2 sets of 10 repetitions per leg.
There are several paths that lead to the goal. Nevertheless, there are some principles that you should definitely follow if you want to be successful in the long term.

Why does an athlete's maximum heart rate differ depending on the sport?
